Open CV Baby steps 3: Circle detection
2018-6-19
By Sumit Kumar Maitra
So far we have seen how to install OpenCV and capture images from a video stream. Today we'll see how we can detect circles (or balls) in an image. Last year, the biggest challenge of PiWars was to be able to detect coloured balls kept on four corners of an arena and drive a robot towards it. Now I don't know if they will have the same challenge this year, however we can use this as a starting point to use a few more OpenCV tricks. Today we'll learn about how to use Hough transforms in OpenCV and how we can use it to detect balls in an image.
Hough transforms
Hough transforms is used loosely to cover the mathematics involved in detection of shapes in images. The original Hough transform was invented to machine analyse images of Bubble chambers. But Hough transforms as we know now and implemented in OpenCV was adapted for generic shapes like circles and ellipses was improved upon much later by Richard Duda and Peter Hart.
Anyway, enough history, here's the wikipedia article if you are really interested.
Also applying a proper Hough transform is too compute intensive so Open CV uses what's referred to as Hough Gradient.
Applying Hough transform in Open CV to detect circles in images
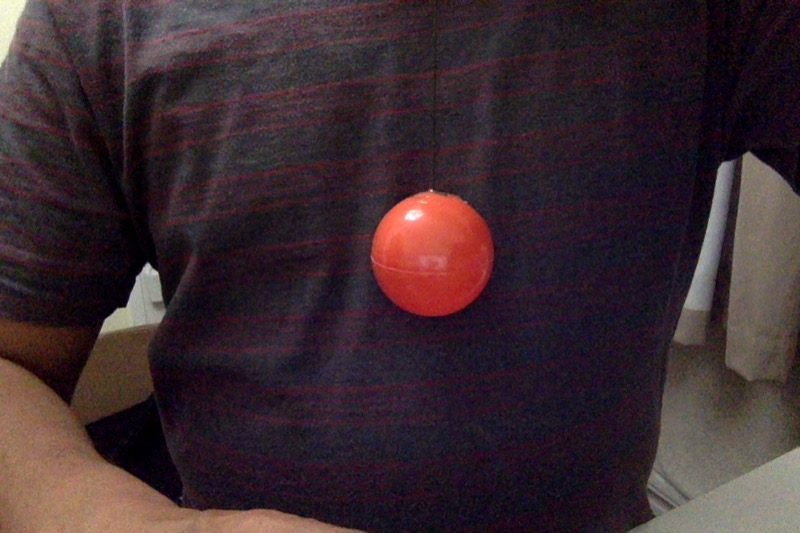
We will use this image of me holding up a red ball as our input and try to detect the ball and draw a circle around it as well as put a red dot at the center of the detected circle.

- We load the image using imread
img = cv.imread('/home/pi/Pictures/Red.jpg',0)
- We apply a blur to soften it up
img = cv.medianBlur(img,5)
- Convert the blurred image to grayscale
cimg = cv.cvtColor(img,cv.COLOR_GRAY2BGR)
- Get OpenCV to run the HoughCircles function on the grayscale image.
circles = cv.HoughCircles(img,cv.HOUGH_GRADIENT,1,20,
                            param1=50,param2=52,minRadius=1,maxRadius=150)
Parameters for the function are as follows (copied from documentation): - InputArray image : This is the input image - int method : The enum value indicating the detection method to use - double dp : Inverse ratio of the accumulator resolution to the image resolution. For example, if dp=1 , the accumulator has the same resolution as the input image. If dp=2 , the accumulator has half as big width and height. - double minDist : Minimum distance between the centers of the detected circles. If the parameter is too small, multiple neighbor circles may be falsely detected in addition to a true one. If it is too large, some circles may be missed. - double param1 : First method-specific parameter. In case of HOUGH_GRADIENT , it is the higher threshold of the two passed to the Canny edge detector (the lower one is twice smaller). - double param2 : Second method-specific parameter. In case of HOUGH_GRADIENT , it is the accumulator threshold for the circle centers at the detection stage. The smaller it is, the more false circles may be detected. Circles, corresponding to the larger accumulator values, will be returned first. - int minRadius : Minimum circle radius. - int maxRadius : Maximum circle radius. If <= 0, uses the maximum image dimension. If < 0, returns centers without finding the radius.
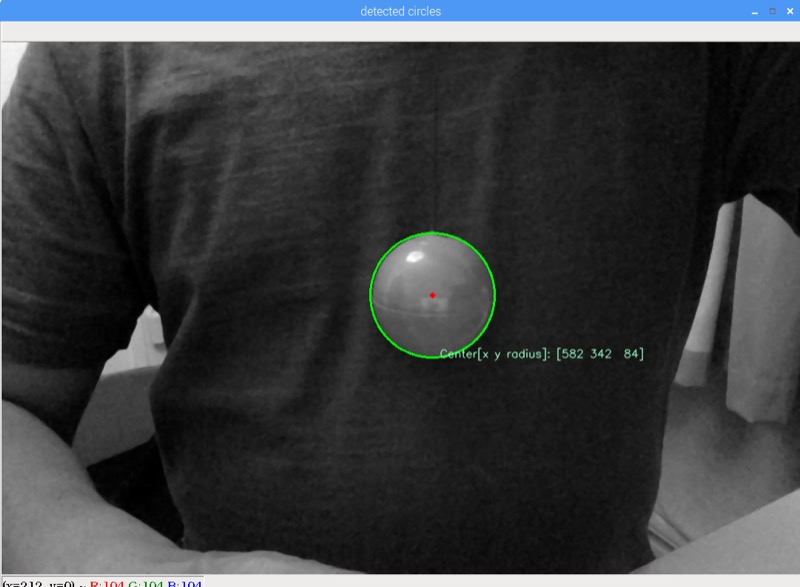
I played around with the param1 and param2 till I got the transform to detect the ball. Initially it was too sensitive and there were lots of false positives. Eventually with the values provided above I ended up with the following image.  .
.
As you can see I've also super imposed the detected circle in green, its center point in red and a bit of text indicating the position of the circle. We need the following code to do this:
font = cv.FONT_HERSHEY_SIMPLEX
height, width = cimg.shape[:2]
for i in circles[0,:]:
    # draw the outer circle
    cv.circle(cimg,(i[0],i[1]),i[2],(0,255,0),2)
    # draw the center of the circle
    cv.circle(cimg,(i[0],i[1]),2,(0,0,255),3)
    cv.putText(cimg,'Center[x y radius]: ' + str(i),(i[0]+10,i[1]+i[2]+10), font, 0.5, (200,255,155), 1, cv.LINE_AA)


cv.imshow('detected circles',cimg)
cv.waitKey(0)
cv.destroyAllWindows()
circles is populated by the Hough transform OpenCV function, containing an array of detected circles. Each circle itself is an array of the x, y co-ordinates for position of the center and the radius to draw it around.
We call the circle function twice, to draw the circle and the center point.
Once all is done we show it in a form using the imshow call.
The full code listing is as follows
import numpy as np
import cv2 as cv
img = cv.imread('/home/pi/Pictures/Red.jpg',0)
img = cv.medianBlur(img,5)
cimg = cv.cvtColor(img,cv.COLOR_GRAY2BGR)
circles = cv.HoughCircles(img,cv.HOUGH_GRADIENT,1,20,
                            param1=50,param2=52,minRadius=1,maxRadius=150)

circles = np.uint16(np.around(circles))
font = cv.FONT_HERSHEY_SIMPLEX
height, width = cimg.shape[:2]
for i in circles[0,:]:
    # draw the outer circle
    cv.circle(cimg,(i[0],i[1]),i[2],(0,255,0),2)
    # draw the center of the circle
    cv.circle(cimg,(i[0],i[1]),2,(0,0,255),3)
    cv.putText(cimg,'Center[x y radius]: ' + str(i),(i[0]+10,i[1]+i[2]+10), font, 0.5, (200,255,155), 1, cv.LINE_AA)


cv.imshow('detected circles',cimg)
cv.waitKey(0)
cv.destroyAllWindows()
Next we will try to detect multiple colours and draw circles in the detected colours but before we do that we'll see how we can build a little UI that can help us calibrate our algorithms so we don't have to guess values (like we did for param1 and param2 above).
