
OpenCV baby steps 5b: Tweaking HSV masks using Morphological transformations
2018-7-19
By Sumit Kumar Maitra
Well I did think I'll get to blogging so quickly again, but I am currently 'marooned' at one of the most scenic places on earth - Columbia Ice Fields, Jasper, Canada. Our bus has been impounded by the DoT and we are waiting for a replacement. I've done the nearby hikes and now sitting around in a sun lounger. This was too good a place to not write some code or write about code 🤓. So today I'll just add a couple of lines of code to our previous application, that will improve the HSV mask and make the circles more contiguous.

Morphological transforms in OpenCV
If you refer to the documentation on Morphological transformations in OpenCV, describes them as
Morphological transformations are some simple operations based on the image shape. It is normally performed on binary images. It needs two inputs, one is our original image, second one is called structuring element or kernel which decides the nature of operation. Two basic morphological operators are Erosion and Dilation. Then its variant forms like Opening, Closing, Gradient etc also comes into play._
I'll only describe Erosion, Dilation and Closing here. You can refer to the documentation for the others.
Erosion: Given a two colour image, and white foreground (e.g. our ball), Erosion thins out the ... (yay replacement bus is here)... as I was saying, erosion just like soil erosion takes away the edges of the (white) foreground.
Dilation: This works the opposite of erosion and it expands the white region. The amount by which it is increased is determined by the
kerneldefinition.Closing: Closing operation is basically two operations in one, Dilation followed by Erosion. As you can probably guess Opening is the opposite. I have chosen Closing as the operation to do on our HSV masks because, we have already eliminated noise outside the target area and have only the ball left. But if we look at the Red, Green and Blue balls they have black splotches in the middle. When we dilate there is a good chance it will fill up the black areas in the middle. When we Erode after that since the previous black regions have been filled up, they won't be Eroded, only the border of the circle will be eroded leaving the full ball in view.
Before we get on to applying the Closing transform lets see if we can figure out what a kernel definition is all about.
A kernel is simply a matrix of zeros and one. Size of the matrix defines how far out the Dilation or Erosion will go. OpenCV provides a few enumerations to get kernels that are Rectangular, Cross shaped or Ellipse shaped. For example:
# Elliptical Kernel
>>> cv.getStructuringElement(cv.MORPH_ELLIPSE,(5,5))
array([[0, 0, 1, 0, 0],
       [1, 1, 1, 1, 1],
       [1, 1, 1, 1, 1],
       [1, 1, 1, 1, 1],
       [0, 0, 1, 0, 0]], dtype=uint8)
As we can see the function getStructuringElement has given us a two dimensional array and if you look at the 1s and 0s you'll see the elliptical shape made out by the 1s. The bigger the array, bigger the gaps we can fill in our targeted area.
Now that we have got an idea of what kernel is, lets update our update_circles method to do the Closing transform. Since we don't need to instantiate the kernel everytime update_circles is called I'll just define it in the __init__ function.
def __init__(self):
    self.initialised = False
    # Load image from disk
    self.img = cv.imread('/home/pi/Pictures/All.jpg',cv.IMREAD_COLOR)
    cv.namedWindow(self.window_name)
    # Since the red ball has a lot of splotches we'll go for a big area
    self.kernel = cv.getStructuringElement(cv.MORPH_ELLIPSE,(20,20))
The update_circles function has only one new line that calls the morphologyEx function, is as follows:
def update_circles(self):
    if self.initialised == True:

        # Convert image from BGR to HSV
        self.hsv = cv.cvtColor(self.img, cv.COLOR_BGR2HSV)
        # Apply HSV range for the selected colour via hsv_index (0=Red, 1=Green, 2=Blue, 3=Yellow)
        self.mask = cv.inRange(self.hsv, self.hsv_ranges[self.hsv_index][0], self.hsv_ranges[self.hsv_index][1])
        # Mask is our 2 bit image mask, so we'll apply the transform to it, before we merge it with the original img
        self.mask = cv.morphologyEx(self.mask, cv.MORPH_CLOSE, self.kernel)

        # Apply the mask to the original image so the resultant image only has the colour we are interested in
        self.display_img = cv.bitwise_and(self.img, self.img, mask= self.mask)
        # Blur the image
        self.blurred_res = cv.medianBlur(self.display_img, 5)
        # Convert to grayscale
        self.gray = cv.cvtColor(self.blurred_res, cv.COLOR_BGR2GRAY)
        # Get the circles in the image
        circles = cv.HoughCircles(self.gray,cv.HOUGH_GRADIENT,self.dp, self.min_dist,
                            param1= self.param1, param2=self.param2, minRadius=self.min_radius, maxRadius = self.max_radius)
        if circles is not None:
            circles = np.uint16(np.around(circles))
            height, width = self.blurred_res.shape[:2]
            print("Number of circles: " + str(circles[0,:].size/3))

            for i in circles[0,:]:
                # draw the outer circle
                cv.circle(self.display_img,(i[0],i[1]),i[2],(0,255,0),2)
                # draw the center of the circle
                cv.circle(self.display_img,(i[0],i[1]),2,(0,0,255),3)
                cv.putText(self.display_img,'Center[x y radius]: ' + str(i),(i[0]+10,i[1]+i[2]), self.font, 0.5, (200,255,155), 1, cv.LINE_AA)

        cv.imshow(self.window_name, self.display_img)
Updated HSV tracker
Following image shows the Red ball as seen by the computer without Morphological transforms on the left and one with a Closing transform.
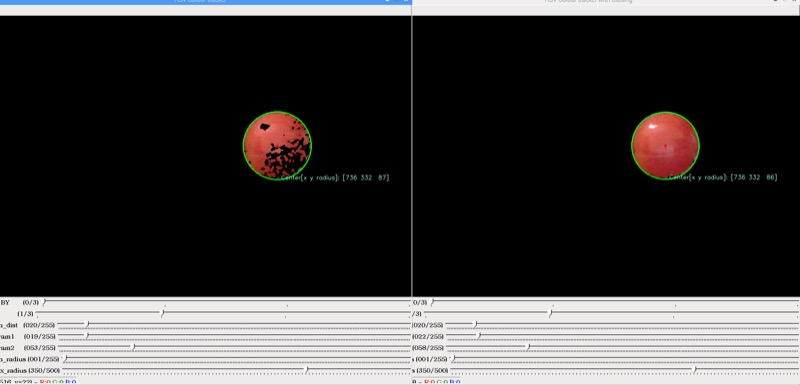
As we can see the one with the transform shows the red ball better.
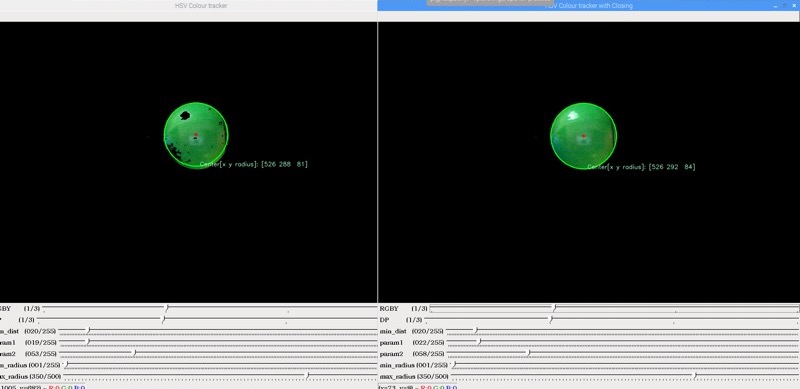
We move the slider to the second position and we see, without changing param1 or param2 we see we have found a better ball detection for the green ball with transformation.
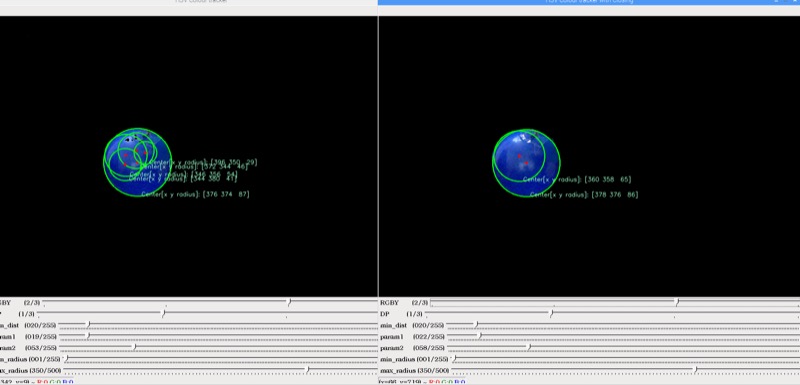
Next we try out the Blue one and we see again, there is less confusion about the circles
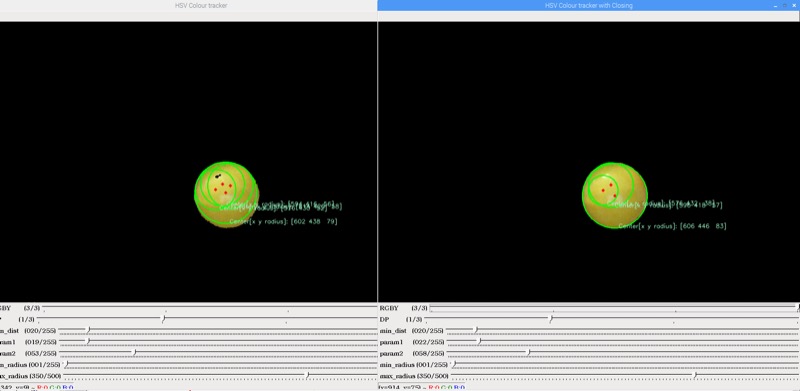
Finally we move the slider to Yellow and without changing the param1 and param2 again, we see the one with the transforms looks like it found the circles better (less count and best fit).
In Conclusion
We learnt about another built-in function in OpenCV and saw how we could use it to improve our Colour separator application.
Morphological transformations of Erosion and Dilation help us reduce noise in a binary image. Also combination of these two can be used in canned transforms like Opening and Closing that do the combinations of the basic transforms.
(Also the replacement bus has now taken us to the next destination of the tour :-) ...)