PiWars 2018: The Aftermath - 1
2018-4-24
By Sumit Kumar Maitra
... and just like that it is all over. PiWars 2018 was a smashing event last Sunday (and we did smash a few things literally :D)
We didn't do well overall and came 10th out of 14 or 15 teams that participated in the Beginners category. I had set my sights on much higher, but obviously didn't work towards it correctly. So in this post and probably the next one, I'll outline the lessons learnt and the plan forward. We fully hope that a #PiWars 2019 does happen and we are given a chance to participate in it again.
What went Right
The Build

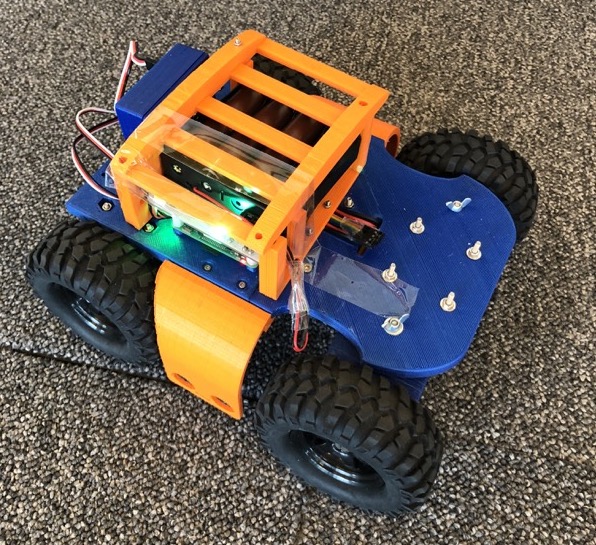
- The chassis bed is good and firm, with some niggles around the canopy and battery holder.
- The motor brackets were good and solid, survived quite a bit of thrashing during the competition.
- The Ackerman steering - Didn't imagine it was going to be trouble free but it surprising was. It didn't fall off, didn't mis-behave, and helped steer Pi-o-steer to a 10.26 seconds time in straight line speed.
- The Thunderborg controller for powering the Pi and controlling the motors was an absolute joy. There is a minor flip side with non I2C device integration but I'll get to that in a bit. However key things to note about Thunderborg are
- Along with the Lid/Plate you get a functional On/Off switch that phsically disconnects your Pi from whatever you are powering the Thunderborg with. It is a life saver. No, and I repeat, no hardware was burnt during the making of Pi-o-steer.
- Thunderborg manages Power to the Pi and Motors very nicely. I didn't have any issues with the controller or other components going quirky due to power fluctuations.
- Thunderborg has only two H Bridges, so you get to control the right side motors and left side motors. This might be a problem is you are using independent wheel steering like for robots with Mercanum wheels and capable of going sideways.
- It communicates with the Pi over I2C bus and the address is programmable so you can dasiy chain multiple Thunderborgs together.
- Ultraborg is super versatile for controlling Servos and the API is perfectly adequate. I didn't get a chance to use the Ultrasonics fully. They were a bit slow when I started, but I think I just need to optimise my code better to make full use of the board.
- The Pixy Cam worked brilliantly for straight line speed. We were a little lucky about the afternoon time slot for straight line speed. The speed we got was more to do with inefficient code than hardware.
- The HobbyWing UBEC was predictable and powered the Ultraborg with a steady 6V when powered via the batteries.
- 18650 Batteries are bulky workhorses. I was looking for less 'explody' batteries and turns out 18650s are the batteries used in Teslas (and vaping machines O_o). They didn't need a complicated charger setup and provided upto 20amps of current if required. They were the powerhouse for the big and chunky Pi-o-steer. I had carried four sets with me, but I needed only two. [Updated: April 25, 2018]
- The Controller: I used a Rock Candy Controller and did not have any issues. The one rule of thumb I used was to make sure the Controller was paired with the controller in the team room itself which is much less crowded as far as WiFi bands are concerned. Secondly if you see issues with connectivity, swap the controller batteries for fresh/freshly charged ones. David pride won the intermediates section with Rock Candy Controller, so they worked for me. I might try an XBox One controller next time! [End update]
The challenges
Straight line speed
Well, we got 2 clean runs and one rescued run using PixyCamera. Our best timing was about 10 seconds. While I don't call it 'right' because at home I had done 9 seconds and was hoping to do a sub 4 second with full power, unfortunately I squirreled at all the wrong tasks and didn't have enough time to do the final bit of tuning that would have allowed us to go much faster.
I will get back to it later this week and post the details.
Duck shoot
Till Saturday night I had no idea about how to do Duck shoot. I had no special attachments and was completely clueless. Saturday night I sat down in the hotel and looked at the golf grabber. First thing I did was to write code for the golf grabber to move up and down. I noticed there was a small curve in its path that would provide a small 'kick' to any ball if it was close enough. So I coded the Joystick to move the kicker appropriately.
It kind of worked at the event. Even though the nudges were very gentle we managed to score 3/5, 3/5 and 2/5 in our three attempts. This was our first challenge of the day and we started feeling hopeful for the rest.
Obstacle course
My boy did the obstacle course and the robot behaved perfectly (thanks to Thunderborg). Apart from a bit where we got lost on the turntable, it was pretty flawless. The bot powered through the rock paper scissors without breaking a sweat. The bridges and blockades were set up and aside as required and we managed a time of 2.05 seconds. Not blazing the trail by any means but not too shabby either.
What went wrong
You can guess why we were in 10th place because we are already in the "what went wrong section".
The Build
The battery holder and canopy weren't tested properly because they were built the first time for the final robot. With a 3D printer as inaccurate as mine, that was never going to fly. Need to complete the top part of the chassis so it looks like a nice little monster truck or something to give it full character.
The Golf grabber! While it saved the day by acting as our duck shooter, it failed spectacularly at the actual golf challenge. Though a part of it was poor code and understanding of the 'cushion-y' effect of astro turf.
- I had tuned to code to keep the grabber just a tiny bit above ground... solid ground... On astro the 2+ kg robot sank a few mm, enough for the grabber to touch the ground.
- The controller code was not tuned to reduce power delivery to the motors and even with the left trigger set to lower speed, the robot was too fast to be controlled in the tiny (comparatively) golf course.
- Combination of the above to resulted in the Robot driving forward very fast, while the grabber dug into the astro, resulting in the grabber snapping in 3 bits at the very first attempt. Disaster, we never recovered from. Our only other attachment to push the ball around wasn't enough again because the robot was too fast to navigate.
The Pan-Tilt mechanism! It was the one bit I had spent most of my time perfecting. It worked beautifully for SOTR when I was trying it at home. At the competition it worked twice before the event when I was trying to calibrate it in the pit room, and then the tilt motor broke and went full puppy on me. It stopped responding to code and kept going up and down uncontrollably. Will do some further investigation into what went wrong.
- This setback hurt the most because it was the show-piece attachment for Pi-o-steer and it failed for the challenge I had worked the hardest on.
Pi Noon attachment! While the over engineered attachment was strong enough to hold on to the 3mm rod with its dear life in gale force winds, the whole thing was not 90 degrees to the ground, resulting in a slight tilt backwards. This meant our poking needle was a pointing a little up which gave us a bit of dis- advantage. It was enough for Dalek Bot to take us out very easily. We need more practice for next time!
The Ultrasonic holders though never used, weren't 3D Printed correctly because they thinned out too much.
The Thunderborg controller works fabulously over I2C bus and provides the right extensibility, but once you use it as HAT (hardware attachment on top) you loose direct access to all RaspberryPi GPIO pins making SPI or other GPIO access slightly tricky. Only way out is put a pico hacker and an angled header to get something out. That said I was able to bend pin 7 and 19 to get what I needed to have 3 more pHATs and the button Shim integrated (thought it didn't go on the final bot).
Apart from the build, there was a ton wrong with my approach towards building the Robot. I'll do a separate post on those learnings.
For now, its time to catch up with two weeks of sleep-deprivation and start planning for 2019 ;-).

