
PiWars 2019 Diary - A Major design change and other challenges
2019-2-18
By Sumit Kumar Maitra
First up, many apologies for not writing a new post in the last two and a half months. No, I didn't give up on PiWars 2019, it has been just... things... But I am back, hoping to cover all the challenges our team has faced and overcome, in as much details as possible.

So you think your design is done eh?
When I finished my last post, I was confident that my design was done and I was one step away from getting the bot moving and steerable. The height adjustment was working the Motor driver was in, and the first of two Pi-s was hanging off the side (a bit precariously), but it was on the bot, and I had enough code to get all the wheels to move. So what changed?
Raspberry Pi 3A+ got announced
Just when I was trying to shoehorn a Raspberry Pi 3B+ onto the bot, Raspberry Pi foundation announced the 3A+. Same processor (as 3B+), half memory, only one USB port but 2/3rd the size and less than 1/2 the height of a full blown Pi 3B+. I was ecstatic, seems like they had launched the Pi 3A+ with PiWars in mind. Yet, after land (err... Pi) grabbing a couple of Pi 3A+s I found that it was nearly impossible to put it on the chassis' base plate even with weirdly shaped brackets. I tried, I really did.
... it gets worse before it gets better
As I was gearing to wind down for the holiday season I fell sick. Months of not taking care of self caught up with me and I was bed-ridden for 3 weeks, with nothing but low-grade fever and cough/cold. Doesn't sound like much but it was the worst I've felt in a very very very long time. I was nearly completely out of action, no standing desk, no exertion, only lie in bed, eat sleep, paracetamols and repeat.
Sitting quarantined in the house with nothing but a laptop for company, meant all kinds of devils started playing in my mind with respect to the chassis design. I finally succumbed and redesigned the chassis from scratch. I made the following changes:
- Instead of the earlier single layer design, I opted for two robust layers that would hold all the components I wanted.
- The top layer would be movable and the bottom layer would be at a set height from ground.
- Sensors and other height sensitive components would go on the bottom layer whereas rest of the components would go on the top layer.
- Instead of trying to use a single motor for controlling all 4 wheel's Ackerman steering, dedicate one servo to each wheel.
- This was going to make the software a little more complex but I had much less mechanical hoops to jump through.
- Also it was easy to imagine how to do a spot turn using four independently controlled wheels.
- I wasn't abandoning Ackerman but actually doubling down, however this time the differential turning would have to be calculated in software instead of using appropriately angled links.
- I also made the bot slightly bigger. This meant it ended up being almost the size of last year's bot which means it will make turning tight corners a challenge, but I am hoping the spot turn mechanism will help.
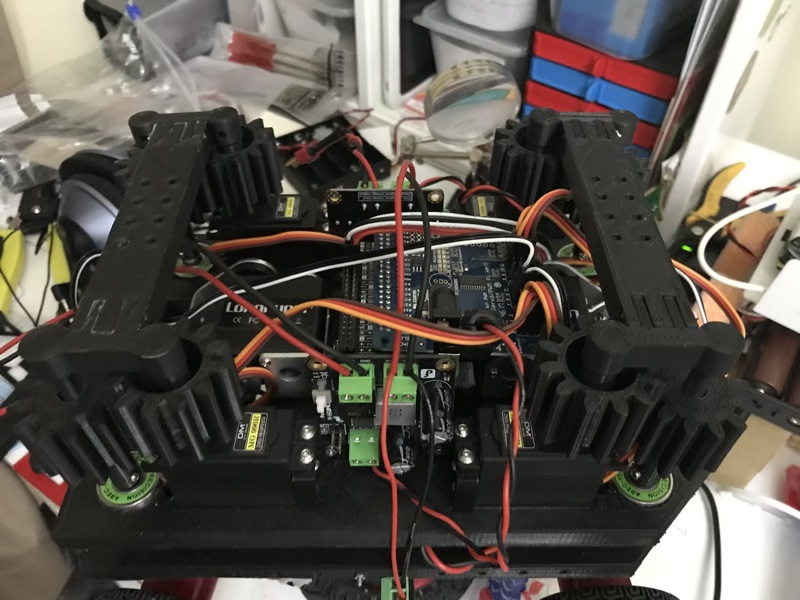
- So even without meteor shooter, I already had six servos and found 4 brushed motors on the bot already. Though a PiconZero can handle six Servos, I was sure I needed more headroom. About this time I discovered the Adafruit controller I had bought originally to be a part of this bot, actually supported 16 servos. So I swapped the PiconZero with the Adafruit Controller.
Testing it out on the new 3D Printer
My 3D Printer has been the lynchpin of my 'creative design' exploits. During Black Friday, I was looking for a cheap metal frame to improve my Prusa clone (stiffer frame means faster printing in theory). Instead I found a full printer for #109/- including shipping. It was a cross between an CR-10 and an Ender, with the bed size being slightly larger than the Ender and slightly smaller than the CR-10. There were some challenges assembling it (for another day), but I ended up improving the printer even before its first print. I was able to use its full bed length, thanks to an extended y-axis extrusion I put in.
All this meant I could print the new chassis frames in one go unlike last year where I had to split, sand, glue, bolt the two parts of my chassis.
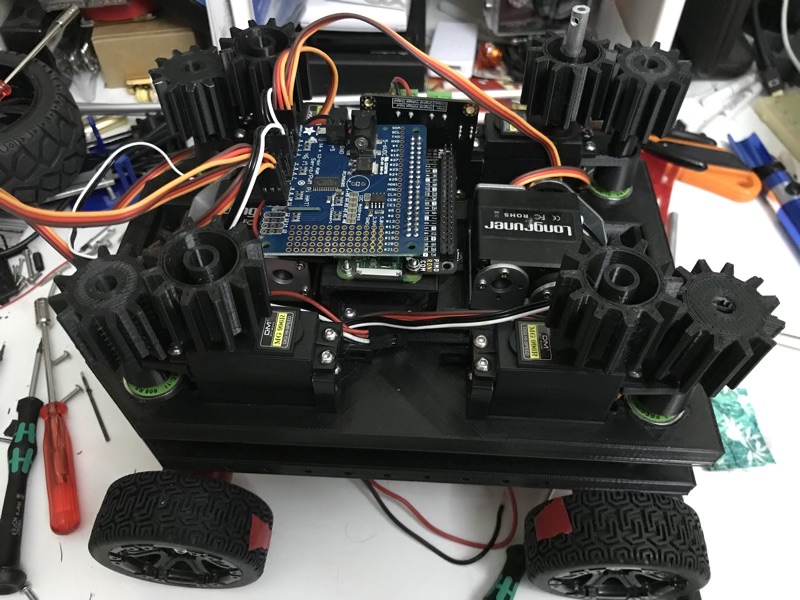
Here's what it looks like

New design, new challenges and "Involute gears"

With the frames printed I dismantled the old bot. Yikes! Mounted the Servos mounted on the new frame, got the DC Motors shoring up the bottom frame and then I was like now what?
The servos where right next to each DC Motors stalk. In a normal world I would bolt the horn to the stalk (using another horn on the stalk) and I could manipulate wheel angle directly. But ours in not a normal world. The whole platform on which the motors are mounted, moves up and down, so it would need a multi-stage link attachment and a bit of complexity to tie it to the horn directly. I couldn't wrap my head around the setup and after a day or so of mulling, I decided to go with 1:1 gears.
First set of gears turned proved the theory but I had missed a vital bit about gear design. My gears had a lot of play so the turn of the wheel wasn't absolute. Thanks to fellow Maker friends on Twitter I was kindly pointed towards looking at "Involute gear design". Luckily, Fusion 360 has an Involute Gear Script. Once I figured that out, getting the gears done correctly was easy.
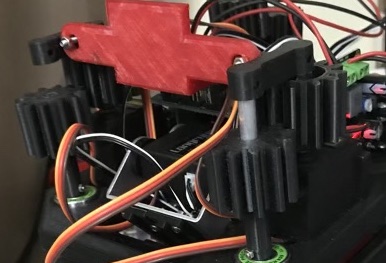
Next bit was to ensure the gears stayed in place so I built two types of links:
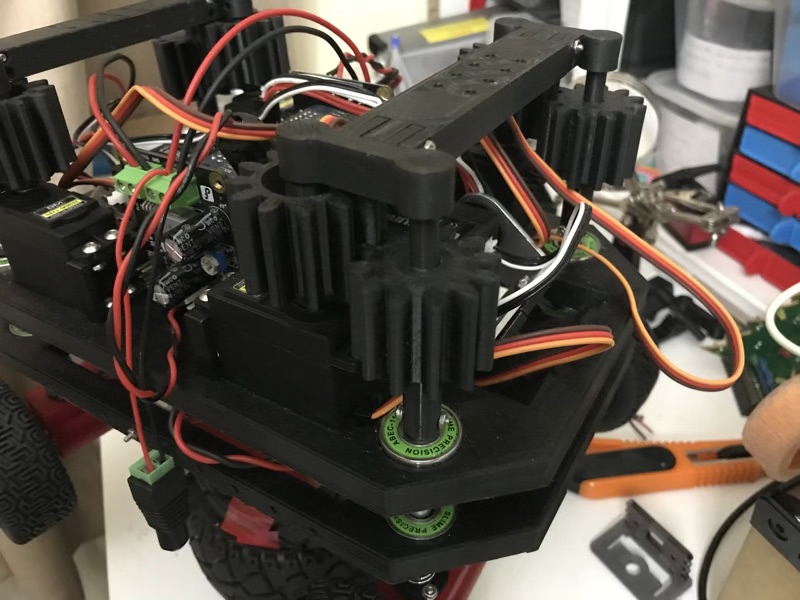
- Links to keep each set of gear together

- Crossbar to join the two sides in front and back.
With this setup the entire bot setup was stable and not wobbly.
Let's write some code, Ackerman steering in software
After the hardware was setup, it was time to do a bit of coding to see if I could turn the wheels as per Ackerman steering principles.
I used the following diagram:

Reference: https://www.me.ua.edu/me364/PDF/Steering_Ackerman.pdf
The following code calculates the angle of turn for the front wheels if I give it an absolute turning angle in degrees.
    """
    L = Distance between front wheel and rear wheel
        L = 178
    R = Distance between Turn Center and center of gravity of the car
    t = Distance between rear wheel pivots
        t = 90
    Outer wheel angle Do = L/(R + t/2)
    Inner wheel angle Di = L/(R - t/2)

    Given we want to turn the bot by say 5 degrees of turn in the outer wheel
    we want to calculate what the inner wheel turn angle is and vice-versa

    The angle of turn determines R, so for Do = 5 degrees = (0.08726646 Radians) we need to calculate R
    first:

    Do x (R + t/2) = L
    R + t/2 = L/Do
    R = L/Do - t/2
      = (178/0.08726646 - 90/2)
    For L = 178, t = 90, Do = 0.08726646, R = 1996

    Now we calculate Di as

    Di = 178 / 1996 - 90/2
       = 178 / 1996 - 45
       = 178 / 1951
       = 0.0912 Radians = 5.225375 degress

    As we can see Di is more than Do which is correct as per Ackerman Steering theory.

    """

    def calculateDi(self, degree):
        L = 178
        t = 90
        Do = math.radians(degree)
        Ro = L / Do - t / 2
        return math.degrees(Ro)

    def angleAbsoluteLeft(self, degrees):
        self.__Do = degrees
        self.__Di = self.calculateDi(degrees)

    def angleAbsoluteRight(self, degrees):
        self.__Do = degrees * -1
        self.__Di = self.calculate(degrees * -1)
I haven't had a chance to try this out yet, because I was adamant about not starting joystick code without testing out the dual Pi setup. That is for the next blog post. So today I'll just leave you with the above code.
More code and a bit of a serialisation framework
While thinking out loud about data storage options (I was contemplating SQLite first), Brian (@usedbytes) on Discord suggested going with plain text for ease of hand edit-ability. This struck me as a good idea, but instead of going .ini or .yaml I opted for .JSON. Why? Simply because I heavily use JSON in my day job. This probably costs a teensy bit in performance, but I'll get back to if it become a serious hindrance. I am sure I'll have other issues first.
I created a base class that can do the following:
- Load JSON given a file handle and convert it into an usable Python object
- Load JSON from a string and convert it into a usable Python object
- Save any class that inherits from the base class as a JSON file.
import json

class SerialisableBase:
    __json_file = ""

    def __init__(self, json_def, json_file):
        if json_def != None:
            s = json.loads(json_def)
            self.deserialise(s)
        if json_file != None:
            self.__json_file = json_file
            file_object = open(json_file, 'r')
            s = json.load(file_object)
            self.deserialise(s)

    def deserialise(self, json_dict):
        for field, value in json_dict.items():
            self.__dict__[field] = None if field not in json_dict else json_dict[field]

    def serialise(self, selfie):
        return_dict = dict()
        for field, value in selfie.__dict__.items():
            if not field.startswith('_'):
                return_dict[field] = value
        return return_dict

    def save(self, file=None):
        if file != None:
            self.__json_file = file
        if self.__json_file != None:
            file_object = open(self.__json_file, 'w+')
            s = json.dump(self, file_object, default=self.serialise)

        else:
            print("Serialization error: Please provide destination either in constructor or Save")
Once the base class was set, I was ready to save some settings.
The Adafruit controller has 16 GVS (Ground Voltage Signal) ports number 0 to 15. I thought it would be a good idea to have this configurable, given I kept plugging the motors in and out of the board.
Next thing I needed to save was, the Motor settings to ensure the 'zero' position of the servos would be such that the bot moves straight. Currently the SteeringStatus class has the following fields (I didn't know about properties in Python back then, I'll refactor in future).
import json
from serialisable_base import SerialisableBase

class SteeringStatus(SerialisableBase):
    front_left_port = -1
    front_right_port = -1
    rear_left_port = -1
    rear_right_port = -1
    front_left_delta = 0
    front_right_delta = 0
    rear_left_delta = 0
    rear_right_delta = 0
    front_right_start = 135
    front_left_start = 135
    rear_left_start = 135
    rear_right_start = 135
    actuation_range = 160
    suspension_front_max = 135
    suspension_front_min = 70
    suspension_rear_max = 135
    suspension_rear_min = 70

    def __init__(self, json_def=None, json_file=None):
        super().__init__(json_def, json_file)
To manage the settings, I ended up writing a small terminal based menu system. This will replaced by a GUI system using the GFX in the near future. Not showing the code for the terminal menu because it was throw-away and also I've broken it atm ;-).
Ready for next step...
Right, then time to close this post, in the next one, I'll share how I did inter-pi-communication over Bluetooth using BlueDot!