
Update 5: Getting started with Pixy camera
2018-3-6
By Sumit Kumar Maitra
Getting snowed in last week caused a lots of problems for UK but it resulted in some unexpected gains towards our PiWars project.
I was able to integrated Pixy with our bot and get rudimentary code going for it to steer itself in direction of an item it is trained for. This is very exciting in itself. I also got some major confidence boost in my Python abilities when I was able to move our entire stack to Python 3. I am improving daily :-).
Getting started with Pixy CMU Camera
Getting started with Pixy is really super easy if you find and follow their documentation. However the indexing of their documentation is a little quirky so you'll have to find you way around it. I followed their documentation to the core and ended up compiling the code as they suggested on the Pi. This gave me Python 2.x bindings for Pixy. There is a small change you need to do in their script to get Python 3 bindings.
Here is how I went about it.
Training Pixy on a Mac or PC
First thing to do is test if your Pixy is all good. To do this you can use a PC or a Mac (or a RaspberryPi with a Desktop OS installed. My PiWars bot is running Raspbian Lite so I trained it my laptop).
Download the installer for your computer from here http://cmucam.org/projects/cmucam5/files and install PixyMon.
Connect Pixy to your computer using a Mini (not Micro) USB to USB cable. The LED in front of Pixy will bink a few times and settle down.
Start PixyMon. It should show Pixy Detected.
You can train Pixy in two ways
- Using the button on Pixy
- Press and hold the button on top of Pixy till the LED blinks. Pixy and now entered training mode.
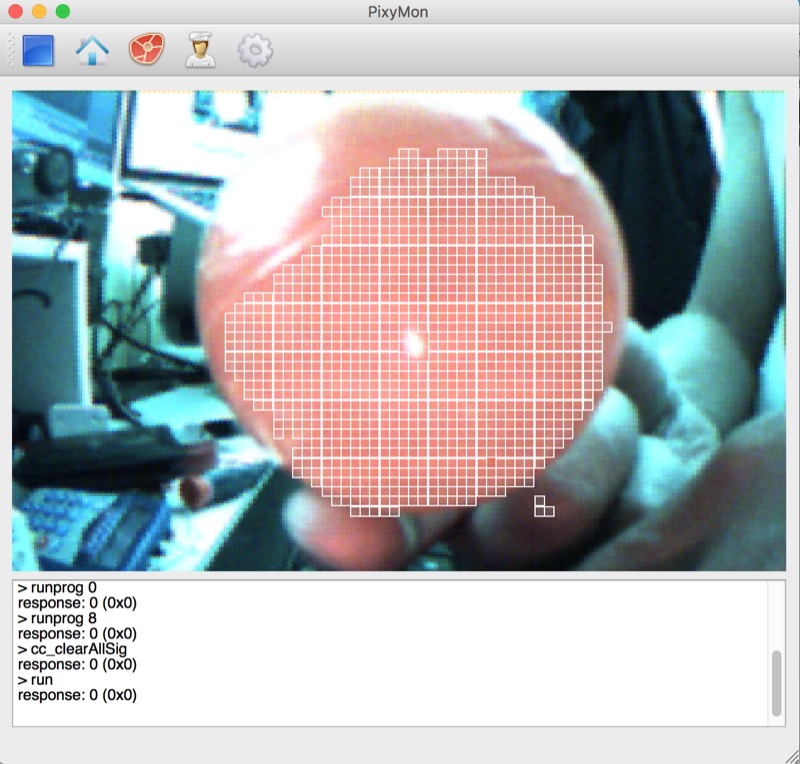
- Bring up the red ball to the camera. PixyMon will show the red area segregated out into small small blocks. You can pick block if you think that's the colour that matches the target color the most. Or leave it as is.
- Press the button again on Pixy and it will remember the object now. It not only remembers the color but also the shape.
- In PixyMon you can give the shape a name like "Red ball", Pixy will return this label via its API when it detects the object.
- Using PixyMon itself
- Bring the object/ball in view of Pix so it is visible on PixyMon's output as well
- Click on Action Menu and select "Set Signature 1..." menu item.
- The Picture on PixyMon will freeze and you can select an area on the frame that best represents the ball
- PixyMon will start highlighting the area Pixy thinks represents the identified object.
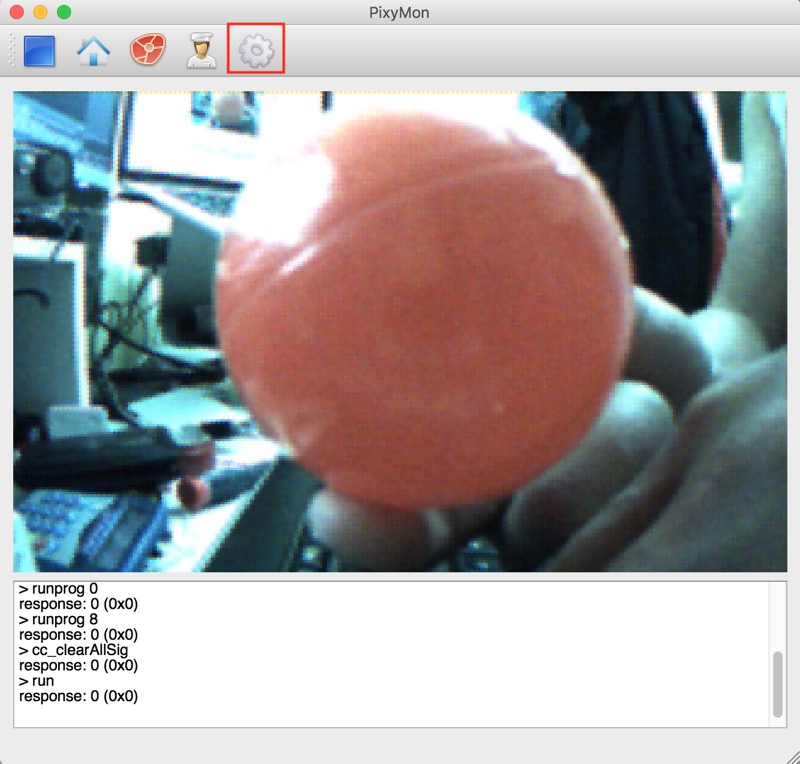
- You can now click on the "Gear" menu bar button to bring up the Configure dialog. Here adjust the Signature range to make sure it is highlighting the most relevant colors only and selecting the largest area on the ball possible.
- Change to the Signature Labels tab, and change the Label to easily identify the object (e.g. Blue ball)
- Click OK to save the Signature.
- Now if you take the object you just trained in front of Pixy the LED on Pixy will turn the same colour as the object.
- Repeat this process for all the balls
Compiling Pixy Code
The steps for compilation are provided on the Pixy site at http://www.cmucam.org/projects/cmucam5/wiki/Building_libpixyusb_as_a_Python_module_on_Linux
I'll repeat these here and show the modification required as well.
** Pre-requisites **
- Install SWIG
sudo apt-get install swig
- Install libusb-1.0-0-dev
sudo apt-get install libusb-1.0-0-dev ```

- Install g++ (compiler)

```bash
 sudo apt-get install g++ ```

- Install libboost

```bash
sudo apt-get install libboost-all-dev
** Build from original source (Python 2.x) **
These are steps I took to install it myself. However I have cloned the library that gets rid of a couple of steps, in the next section and compiles to Python 3. This assumes you are on a terminal window in your home folder. If you are not sure, just do cd ~/ to get to your home folder before you start.
- Download Pixy source code
git clone https://github.com/charmedlabs/pixy.git
- Build the Python module
cd pixy/scripts
./build_libpixyusb_swig.sh
- Make sure your Pixy is connected to a USB port on your computer. Then in the terminal window type:
cd ../build/libpixyusb_swig
python get_blocks.py
Now bring up one of the balls you trained Pixy with, in front of the camera, you should see blocks:
Pixy Python SWIG Example -- Get Blocks
[BLOCK_TYPE=0 SIG=1 X=220 Y= 17 WIDTH= 43 HEIGHT= 35]
[BLOCK_TYPE=0 SIG=1 X=220 Y= 23 WIDTH= 42 HEIGHT= 47]
[BLOCK_TYPE=0 SIG=1 X=220 Y= 23 WIDTH= 42 HEIGHT= 47]
[BLOCK_TYPE=0 SIG=1 X=220 Y= 23 WIDTH= 42 HEIGHT= 47]
[BLOCK_TYPE=0 SIG=1 X=220 Y= 23 WIDTH= 42 HEIGHT= 46]
[BLOCK_TYPE=0 SIG=1 X=220 Y= 23 WIDTH= 45 HEIGHT= 46]
[BLOCK_TYPE=0 SIG=1 X=219 Y= 23 WIDTH= 43 HEIGHT= 46]
If you don't see any block information, try running as superuser:
sudo python get_blocks.py
** Build from forked source (Python 3.x) **
I forked the original repository and added a new file that allows you compile to Py3 directly. So you can directly clone my repository into a new folder and compile it.
- Create a new folder
mkdir ~/pixypy3
cd ~/pixypy3
- Download Pixy source code
git clone https://github.com/piofthings/pixy.git
- Build the Python module
cd pixy/scripts
./build_libpixyusb_swig_py3.sh
- Make sure your Pixy is connected to a USB port on your computer. Then in the terminal window type:
cd ../build/libpixyusb_swig
python get_blocks.py
Now bring up one of the balls you trained Pixy with, in front of the camera, you should see blocks again as for Py2.x:
If you don't see any block information, try running as superuser:
sudo python get_blocks.py
** The changes to get it working for Python 3 are minimal **
- In the shell script
build_libpixyusb_swig_py3.shI have changed line 41 to use python3 instead of python. - In the
get_blocks.pysample I've wrapped couple ofprintstatements in parentheses to make them python 3 compatible.
That's it. We are ready to use Pixy.
Setting up telemetry for Pixy values
Like with Ultrasonics I decided to start with collecting Telemetry data before I started on any code. Pixy returns the following values.
- Frame : This is a counter of every screenshot Pixy takes. Pixy can do upto 50 per second
- Block Type : Pixy has two block types, one is the contigious like we took above. Other is a combination pattern that we'll see how to use later.
- Signature : This tells us which object has Pixy identified.
- X : The top most corner of the block Pixy detected with respect to Pixy's frame of view (which is about 360 pixels)
- Y : The left most corner of the block Pixy detected with respect to Pixy's frame of view (which is about 200 pixels max)
- Width : Width of the object Pixy detected
- Height : Height of the object Pixy detected
- Angle : This value is relevant when Pixy is detecting patterns. For round objects I've only seen it return zero
Calculated values
- Size : This is Width x Height to give us a quick view of how big the object is in Pixy's view. It is handy to filter out noise
- Distance : I haven't managed to calculate distance correctly but given we know Pixy's Focal length, technically we should be able to detect how far an object is from Pixy. This is a work in progress.
- Factor : This number directly correlates to the value I assign to the steering motor for left or right movement. We'll see how it is calculated below.
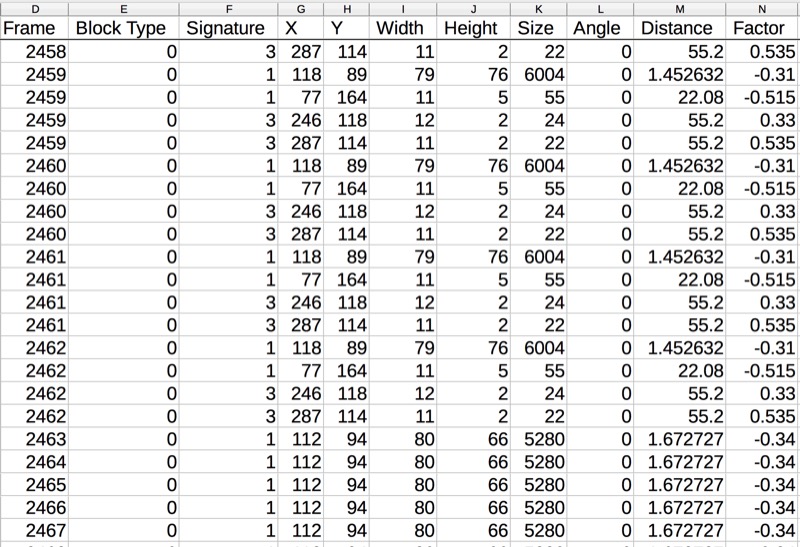
The above is a very small screenshot of Pixy values returned. Mind you Pixy takes 50 "Frames" per second and each frame can have multiple blocks. So that's a lot of lines of data. You'll note Frame 2459 is repeated four times. This means it has detected 4 blocks in the frame, two are of Signature 1 (Red) and 2 of Signature 3 (Yellow). Of these four values you'll see one has size 6004 which is the largest contiguous area detected. The other three blocks only cover 55, 24 and 22 pixels. We can thereby guess Pixy is primarily looking at a Red ball and turning the steering by -0.31 will direct the bot towards the center of the ball.
Using Pixy values to steer the bot
As seen above we are getting a Factor that determines how much the steering turns in which direction. Calculation of factor is done pretty easily.
if(bsize > 1000):
    if(bx < 180):
        factor = -1 * (0.9 / 180) * abs(180 - bx)
        self.__steering.steerAbsolute(factor)
    elif(bx > 180):
        factor = (0.9 / 180) * abs(180 - bx)
        self.__steering.steerAbsolute(factor)
    else:
        self.__steering.reset()
First we filter out objects smaller than 1000 so we steer only when object size is > 1000. This number is theoretical. At 1000 the robot wasn't responding when the ball was over 2 feet away. So we have to calibrate that number later, however that's a filter.
Next we see if X is less than 180. Given Pixy image is 360 x 200 we assume less than 180 requires movement to left, and greater than 180 requires movement to right.
Finally the steering is setup to move between values of -0.9 to +0.9. Given this we calculate the factor using simple ratios.
I have added a new function in the Steering class steerAbsolute that simply sets the steering position to the value its being passed.
That's it.
Just getting started
This was just a 'getting started'. Pixy is terribly exciting from Robot vision perspective. Compared to Ultrasonics results are returned way faster and much more accurate. Once I have worked out the mehcano-electronic details of fitting the Pixy Cam on to the robot, I am going to use it for the Maze solver and possibly straight line speed as well.