
OpenCV baby steps 5: Tracking multiple colours
2018-7-17
By Sumit Kumar Maitra
Sorry, its been a while since I took my last baby step. I have been in the midst of a few things and funnily enough, as I start typing this, I am actually holidaying in Canada. The drive from Vancouver to Kamloops is very very scenic :D. Eitherways, learning never stops, holidaying or not. I have been struggling to go ahead with my plans to track multiple coloured objects in the same frame. I mean in the last post we saw how we can identify four coloured balls using HSV masking. Also in step 3 we saw how to detect circles using OpenCV's HoughCircles function. What I wanted was a combination of the two - Detect position of a ball of my choice e.g. Red ball is placed here (x,y,radius). Turns out it was my lack of Python knowledge than OpenCV that got in the way. OpenCV continues to amaze me for its versatility and ease of use.
Note: Previously, I said I would do this with a live camera feed, but since this step has taken so long and the fact I don't have all the things I need to use a camera feed, we'll do this using the static image. Hopefully I'll be home in time for the next post and we'll use a Camera feed.

Building an app to track different coloured balls
In this article we will build a small app, like last time, that loads an image that has four coloured balls. We'll add track bars so that we can select the colour of ball we want to detect, and also all the input paramters of the HoughCircles function. This way, we will be able to filter out each ball by colour and then run the Hough Circle detection algorithm and vary its paramters till we have identified each parameter. We will use the previously detected HSV ranges for each colour.
This time we'll create a proper class instead of a global function because as I figured out (the hard way), you can loose the current context or self when using callbacks in OpenCV when using global functions.
We call the class Main for the lack of imagination at the moment. We then define all the parameters that we want to be adjustable. These are the input values to the HoughCircles function and HSV range values for each colour that we determined using our previous HSV Calibrator app. We have four values red_hsv, green_hsv, blue_hsv, yellow_hsv that we then add into the hsv_ranges array. We do this so we can select which colour to target using a track bar, where the track bar position corresponds to the index of the appropriate HSV range.
class Main():
    # Hough Circle params
    dp = 1
    min_dist = 20
    param1 = 30
    param2 = 60
    min_radius = 1
    max_radius = 350

    # Pre defined HSV ranges
    red_hsv    = [np.array([  0, 125, 102]),np.array([  8, 255, 255])]
    green_hsv  = [np.array([ 49, 115,  70]),np.array([ 98, 237, 255])]
    blue_hsv   = [np.array([ 96,  92,  77]),np.array([129, 255, 255])]
    yellow_hsv = [np.array([ 20,  91, 126]),np.array([ 43, 228, 255])]

    hsv_ranges = [red_hsv,
                  green_hsv,
                  blue_hsv,
                  yellow_hsv]

    window_name = "HSV Colour tracker"

    img = None
    hsv = None
    mask = None
    display_img = None
    blurred_res = None
    gray = None

    font = cv.FONT_HERSHEY_SIMPLEX
    hsv_index = 0

    def __init__(self):
        self.initialised = False
        # Load image from disk
        self.img = cv.imread('/home/pi/Pictures/All.jpg',cv.IMREAD_COLOR)
        cv.namedWindow(self.window_name)
The other parameters are:
img: The image loaded from the diskhsv: We change colourspace fromimg's BGR to HSVmask: We apply the selected HSV Range and create a masked image that only highlights one colour.display_img: We merge themaskand theimgusing OpenCVbitwise_andoperation to get a BGR image that only has the ball of the colour we selected. We will use this as our base image in our app.blurred_res: Before we apply hough transform we apply a blur todisplay_imggray: Last step before we applyHoughCirclesis to grayscale theblurred_resimage. Remember since we applied the HSV range already we know which colour ball is in the picture. TheHoughCirclesfunction is only supposed to tell us where the ball is in the frame.font: As seen previously the font we use for writing on the image.hsv_index: The index indicating which HSV range is being used (0=Red, 1=Green, 2=Blue, 3=Yellow)
The constructor of the class does a few things, like loading the image from the disk, setting
I am going to take a break from explaining line by line and instead go function by function here. I have nearly explained the steps we take before we call HoughCircles function. All those steps are encapsulated in the update_circles function. This function is called on change of any of the track bars.
It has a check to make sure it doesn't try to refresh before all the parameters are ready via the if self.initialised == True check.
Rest of the code populates the variables we declared above, using one OpenCV image function at a time.
Once the circles have been detected we draw them out on the display_img and show it in our named window.
    def update_circles(self):
        if self.initialised == True:

            # Convert image from BGR to HSV
            self.hsv = cv.cvtColor(self.img, cv.COLOR_BGR2HSV)
            # Apply HSV range for the selected colour via hsv_index (0=Red, 1=Green, 2=Blue, 3=Yellow)
            self.mask = cv.inRange(self.hsv, self.hsv_ranges[self.hsv_index][0], self.hsv_ranges[self.hsv_index][1])
            # Apply the mask to the original image so the resultant image only has the colour we are interested in
            self.display_img = cv.bitwise_and(self.img, self.img, mask= self.mask)
            # Blur the image
            self.blurred_res = cv.medianBlur(self.display_img, 5)
            # Convert to grayscale
            self.gray = cv.cvtColor(self.blurred_res, cv.COLOR_BGR2GRAY)
            # Get the circles in the image
            circles = cv.HoughCircles(self.gray,cv.HOUGH_GRADIENT,self.dp, self.min_dist,
                                param1= self.param1, param2=self.param2, minRadius=self.min_radius, maxRadius = self.max_radius)
            if circles is not None:
                circles = np.uint16(np.around(circles))
                height, width = self.blurred_res.shape[:2]
                print("Number of circles: " + str(circles[0,:].size/3))

                for i in circles[0,:]:
                    # draw the outer circle
                    cv.circle(self.display_img,(i[0],i[1]),i[2],(0,255,0),2)
                    # draw the center of the circle
                    cv.circle(self.display_img,(i[0],i[1]),2,(0,0,255),3)
                    cv.putText(self.display_img,'Center[x y radius]: ' + str(i),(i[0]+10,i[1]+i[2]), self.font, 0.5, (200,255,155), 1, cv.LINE_AA)

            cv.imshow(self.window_name, self.display_img)
Now that we have see how the HoughCircles function is used to pick out the colour and position of each ball, lets see how the app allows you to manipulate the values.
    def set_dp (self,x) :
        self.dp = x
        self.update_circles()

    def set_min_dist(self, x) :
        self.min_dist = x
        self.update_circles()

    def set_param1(self, x) :
        self.param1 = x
        self.update_circles()

    def set_param2(self, x):
        self.param2 = x
        self.update_circles()

    def set_min_radius (self, x):
        self.min_radius = x
        self.update_circles()

    def set_max_radius (self, x) :
        self.max_radius = x
        self.update_circles()

    def set_hsv_range (self, x) :
        self.hsv_index = x
        self.update_circles()

    def run (self):
        # create trackbars
        cv.createTrackbar('RGBY',self.window_name,0,3, self.set_hsv_range)
        cv.setTrackbarPos('RGBY',self.window_name, self.hsv_index)
        cv.createTrackbar('DP',self.window_name,0,3, self.set_dp)
        cv.setTrackbarPos('DP',self.window_name, self.dp)
        cv.createTrackbar('min_dist',self.window_name,0,255, self.set_min_dist)
        cv.setTrackbarPos('min_dist',self.window_name, self.min_dist)
        cv.createTrackbar('param1',self.window_name,0,255, self.set_param1)
        cv.setTrackbarPos('param1',self.window_name, self.param1)
        cv.createTrackbar('param2',self.window_name,0,255, self.set_param2)
        cv.setTrackbarPos('param2',self.window_name, self.param2)
        cv.createTrackbar('min_radius',self.window_name,0,255, self.set_min_radius)
        cv.setTrackbarPos('min_radius',self.window_name, self.min_radius)
        cv.createTrackbar('max_radius',self.window_name,0,500, self.set_max_radius)
        cv.setTrackbarPos('max_radius',self.window_name, self.max_radius)

        self.initialised = True
        self.update_circles()

        cv.waitKey(0)
        cv.destroyAllWindows()
We have a set of set_[param name] functions that are actually delegate functions, invoked when the respective track bar is changed.
The run function is invoked to start the app and its main job is to initialise the track bars and assign them to the named window we created in the __init__ function.
Each track bar is associated to its own delegate handler. This is a different approach to our previous app where we were running a loop and getting the values off the trackbar.
Once all the track bars have been initiated, we set the self.initialised value to true and invoke the update_circles function which runs the algorithm we saw above.
Finally we tell OpenCV to wait for any key press on which we deestroy all the windows and quit.
That was our full class but there is no instantiation or invocation. So we do that at a global level as follows.
app = Main()
app.run()
Finding appropriate values for each colour
Once we have the full code ready, we run the application, and because the hsv_index is set to 0 it picks the first set of values from hsv_ranges which is for masking out everything but the red ball.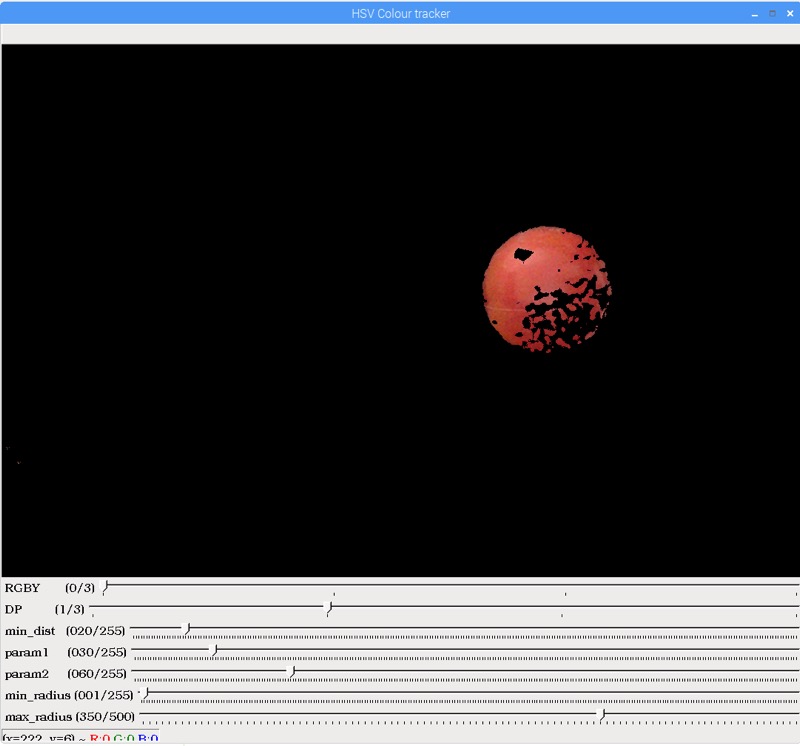 As we can see no circle has been detected using the default values we provided to
 HoughCircles function. The two things we want to tweak here are param1 and param2. We play around a bit with these two track bars to get the function to return some circles.
We have changed param1 to 15 and param2 to 46. Notice, how the circles are in the red region only, because we have masked out the rest of the image.

If we tweak param2 a little more we can eliminate all the extra circles and keep one only.

Next we move the first track bar (RGBY) to position 1. This corresponds to the HSV ranges that masks out everything other than the Green colour so we see only the Green ball in the picture.
We haven't changed the values of param1 and param2 but we see the previous values are good enough to grab a bunch of circles in the green region. Again the key is, due to masking only the green bit has the circles.
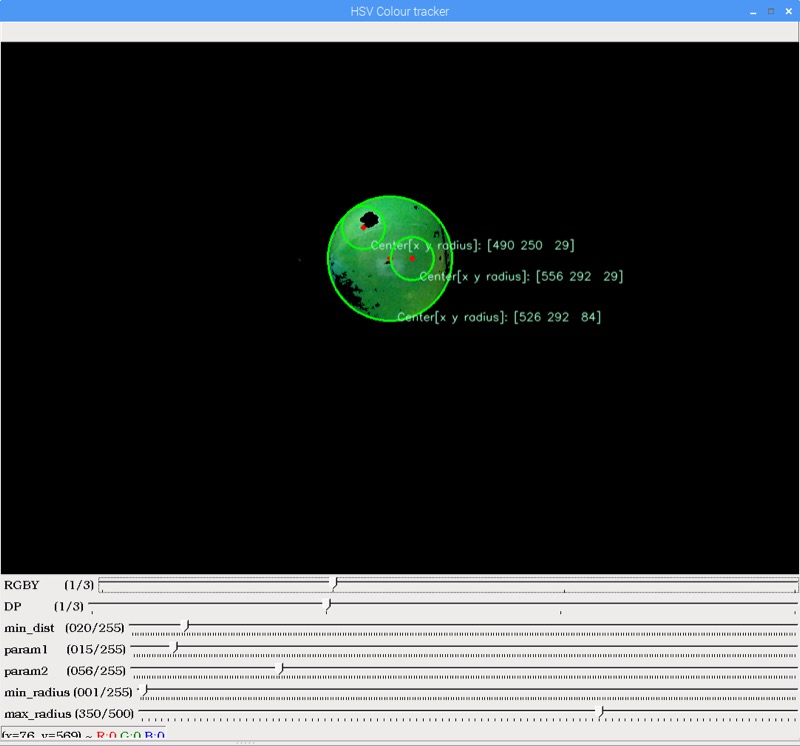
Again we tweak the parameters a bit and narrow it down to one circle. As seen below we have had to increase param2 to 62.

We move RGBY trackbar to position 2 now to apply the mask that leaves the blue ball only.
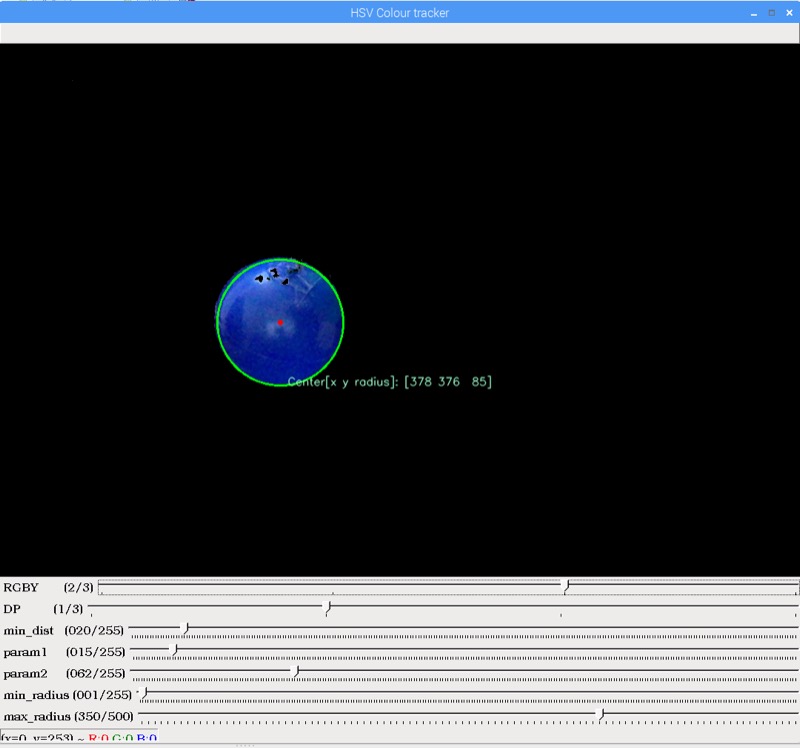 Lo and behold, looks like we don't need to tweak any parameters to get the final blue circle's position.
We move the RGBY track bar to its final position to apply the mask that leaves the yellow ball only. This time we see, the values for blue and green don't quite cut it for yellow.
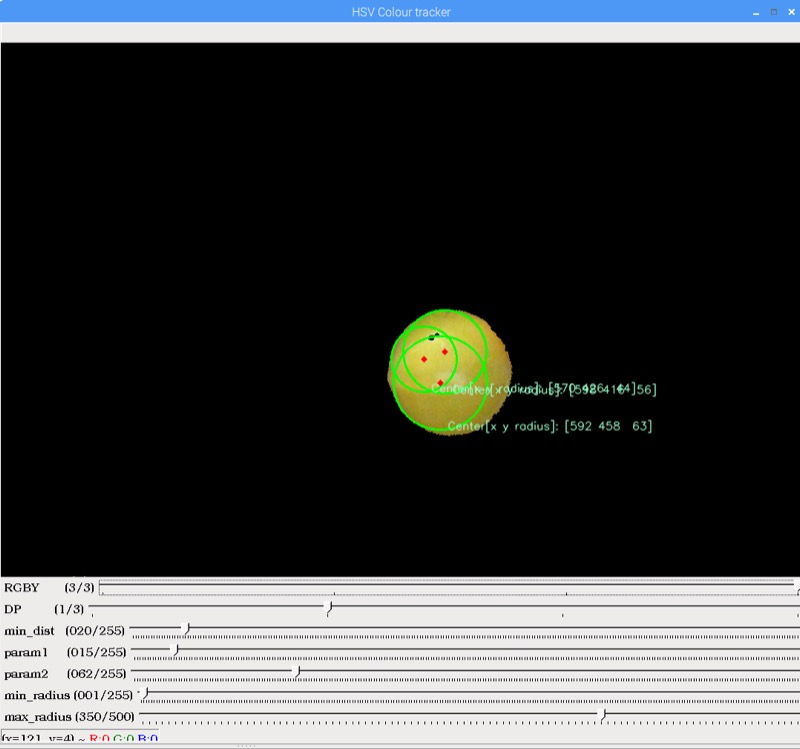
So we tweak the params a bit till we get a circle that encapsulates nearly all of the yellow ball. We have had to tweak both param1 and param2 from previous settings.

Tada! We have an app that can isolate a particular coloured ball and tell us where in the frame, the ball is and how big it is, all using some common OpenCV functions that encapsulate some powerful CV algorithms.
To summarise
I have been noting the param1 and param2 values as we track each colour and we end up with the following values:
Red: param1 = 15, param2 = 56
Green: param1 = 15, param2 = 62
Blue: param1 = 15, param2 = 62
Yellow: param1 = 16, param2 = 68
These are a good head start but to be honest, these values could change completely given different lighting conditions and angles from which they the images are taken. So these values are not written in stone. When you are building a Computer Vision program, no given set of values are perfect or ideal. In future I'll try to show how we can possible work with 'ranges' for everything so that we can handle vagaries of the real world better.
Final note, we have tweaked only param1 and param2 of HoughCircles function. Ideally we want to leave the minimum radius value to as small as possible because from a distance of a couple of feet the ball will be only a few pixels across. So instead of 1 maybe a max value of 3 or 4 is what you should work with. The max value should be worked out based on how close the camera gets to the ball. Also, the image we used here is rather big. manipulating this big images in realtime is going to be very compute intensive, so we'll use a much smaller image to start with, maybe 320x200 pixels or thereabouts.
Full code
The full code is listed below and also available on the Github repository
#!/usr/bin/env python3
import numpy as np
import cv2 as cv
import time

class Main():

    # Hough Circle params
    dp = 1
    min_dist = 20
    param1 = 30
    param2 = 60
    min_radius = 1
    max_radius = 350
    hsv_index = 0

    # Pre defined HSV ranges
    red_hsv    = [np.array([  0, 125, 102]),np.array([  8, 255, 255])]
    green_hsv  = [np.array([ 49, 115,  70]),np.array([ 98, 237, 255])]
    blue_hsv   = [np.array([ 96,  92,  77]),np.array([129, 255, 255])]
    yellow_hsv = [np.array([ 20,  91, 126]),np.array([ 43, 228, 255])]

    hsv_ranges = [red_hsv,
                  green_hsv,
                  blue_hsv,
                  yellow_hsv]

    window_name = "HSV Colour tracker"

    img = None
    hsv = None
    display_img = None
    blurred_res = None
    gray = None
    mask = None
    font = cv.FONT_HERSHEY_SIMPLEX

    def __init__(self):
        self.initialised = False
        # Load image from disk
        self.img = cv.imread('/home/pi/Pictures/All.jpg',cv.IMREAD_COLOR)
        cv.namedWindow(self.window_name)


    def update_circles(self):
        if self.initialised == True:

            # Convert image from BGR to HSV
            self.hsv = cv.cvtColor(self.img, cv.COLOR_BGR2HSV)
            self.mask = cv.inRange(self.hsv, self.hsv_ranges[self.hsv_index][0], self.hsv_ranges[self.hsv_index][1])
            self.display_img = cv.bitwise_and(self.img, self.img, mask= self.mask)
            self.blurred_res = cv.medianBlur(self.display_img, 5)
            self.gray = cv.cvtColor(self.blurred_res, cv.COLOR_BGR2GRAY)
            circles = cv.HoughCircles(self.gray,cv.HOUGH_GRADIENT,self.dp, self.min_dist,
                                param1= self.param1, param2=self.param2, minRadius=self.min_radius, maxRadius = self.max_radius)
            print(str(self.dp) + " " + str(self.min_dist) + " " + str(self.param1) + " " + str(self.param2) + " " + str(self.min_radius) + " " + str(self.max_radius))
            if circles is not None:
                circles = np.uint16(np.around(circles))
                height, width = self.blurred_res.shape[:2]
                print("Number of circles: " + str(circles[0,:].size/3))

                for i in circles[0,:]:
                    # draw the outer circle
                    cv.circle(self.display_img,(i[0],i[1]),i[2],(0,255,0),2)
                    # draw the center of the circle
                    cv.circle(self.display_img,(i[0],i[1]),2,(0,0,255),3)
                    cv.putText(self.display_img,'Center[x y radius]: ' + str(i),(i[0]+10,i[1]+i[2]), self.font, 0.5, (200,255,155), 1, cv.LINE_AA)

            cv.imshow(self.window_name, self.display_img)

    def set_dp (self,x) :
        self.dp = x
        self.update_circles()

    def set_min_dist(self, x) :
        self.min_dist = x
        self.update_circles()

    def set_param1(self, x) :
        self.param1 = x
        self.update_circles()

    def set_param2(self, x):
        self.param2 = x
        self.update_circles()

    def set_min_radius (self, x):
        self.min_radius = x
        self.update_circles()

    def set_max_radius (self, x) :
        self.max_radius = x
        self.update_circles()

    def set_hsv_range (self, x) :
        self.hsv_index = x
        self.update_circles()

    def run (self):

        # create trackbars
        cv.createTrackbar('RGBY',self.window_name,0,4, self.set_hsv_range)
        cv.setTrackbarPos('RGBY',self.window_name, self.hsv_index)
        cv.createTrackbar('DP',self.window_name,0,4, self.set_dp)
        cv.setTrackbarPos('DP',self.window_name, self.dp)
        cv.createTrackbar('min_dist',self.window_name,0,255, self.set_min_dist)
        cv.setTrackbarPos('min_dist',self.window_name, self.min_dist)
        cv.createTrackbar('param1',self.window_name,0,255, self.set_param1)
        cv.setTrackbarPos('param1',self.window_name, self.param1)
        cv.createTrackbar('param2',self.window_name,0,255, self.set_param2)
        cv.setTrackbarPos('param2',self.window_name, self.param2)
        cv.createTrackbar('min_radius',self.window_name,0,255, self.set_min_radius)
        cv.setTrackbarPos('min_radius',self.window_name, self.min_radius)
        cv.createTrackbar('max_radius',self.window_name,0,500, self.set_max_radius)
        cv.setTrackbarPos('max_radius',self.window_name, self.max_radius)

        self.initialised = True
        self.update_circles()

        cv.waitKey(0)
        cv.destroyAllWindows()


app = Main()
app.run()